Product User ManualUpdated 5 hours ago
Product User Manual
SpeakON V1-M
Device Components

- Power Button: Powers the device on/off and performs a factory reset.
- Record Button: Starts and stops recording.
- Indicator Light: Displays device status through various colors and flashing patterns.
- Charging Port: Connects to the included USB-C charging cable.
1. Download the App
 SpeakON Application
Scan the QR code to download the latest version of the SpeakON App.
If you already have it, please update to the latest version.
2. Power On/Off
Power On

- Action: With the device off, press and hold the Power Button for 2 seconds.
- Feedback: The blue indicator remains solid for 3 seconds; the device emits a long vibration.
- Status: Powered on. Bluetooth is enabled and broadcasting.
Power Off
- Action: With the device on, press and hold the Power Button for 2 seconds.
- Feedback: The device emits a single long vibration.
- Status: Powered off.
3. Bluetooth Management
Initial Pairing & Connection

- Action: Ensure the device is powered on. Enable Bluetooth in your iPhone settings. Open the SpeakON app, select the device, and tap Pair or Connect.
- Feedback: The blue indicator flashes rapidly three times, accompanied by a short vibration.
- Status: Connected. The device will automatically reconnect when within range and Bluetooth is enabled.
Waiting for Connection (Standby)
- Status: Standby (Searching)
- Feedback: The indicator remains off.
- Note: Although the LED is off to conserve power, Bluetooth remains active and discoverable (broadcasting).
Connection Lost
- Status: Disconnected. Occurs when the device is out of range or manually disconnected.
- Feedback: No light or vibration prompt.
- Result: The device enters standby and resumes broadcasting. It will automatically reconnect when back within range.
4. Core Recording Process
Prerequisite: The recording function is available once the device is powered on, regardless of Bluetooth connection status.
Start Recording

- Operation: Press and hold the Record Button.
- Feedback: Green indicator stays solid. The device vibrates once (short vibration).
- Result: Recording starts.
Stop Recording
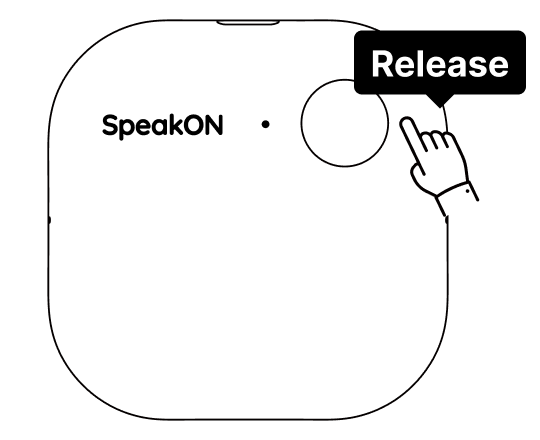
- Operation: Release the button once your speech is complete.
- Feedback: The green indicator turns off.
- Result: Recording stops, and the audio file is saved automatically.
Recording Duration Limit & Auto-Stop
Maximum 5 minutes per session. Upon reaching the limit, the recording will automatically end and save to ensure data integrity.
Feedback: The green light will turn red and flash quickly 3 times before turning off. You will feel one long vibration.
5. Storage Full
Insufficient Storage
- Indication: Solid red LED (while pressing button) and two rapid vibration cycles.
- Status: Recording unavailable. Please sync and delete existing recordings to continue.
6. Charging Management
Connect the standard charger to the Charging Port:
- Charging (Battery < 100%): Green indicator flashes slowly.
- Charging Complete (Battery = 100%): Green indicator stays solid until the charger is disconnected.
- Note: The device does not vibrate while charging.
7. Battery Level Indication
The device monitors battery level during normal operation (on, not recording) and provides warnings:
- Low Battery (≤10%): Red indicator flashes slowly. Functions normally, but immediate charging is required.
- Critical Battery Auto-Shutdown (≤1%): Red indicator flashes quickly 3 times and then turns off. The device powers down automatically.
8. System Reset (Factory Reset)
This operation erases all paired Bluetooth device information and restores factory settings. Primarily used for switching bound devices or troubleshooting connection issues.
- Operation: Press and hold the Power Button for 10 seconds (whether the device is on or off).
- Feedback: Red and blue indicators alternate flashing 3 times and then turn off. The device vibrates twice (long vibrations).
- Result: All user pairing data is erased, and device settings are restored to factory defaults.
9. Indicator & Vibration Quick Reference Guide
| State | Trigger (Operation) | LED Feedback | Vibration Feedback | Meaning & Outcome |
|---|---|---|---|---|
| Power On | Hold power button for 2s | Blue solid for 3s, then off | 1 long vibration | Powered on, bluetooth broadcasting |
| Power Off | Hold power button for 2s | LED off | 1 long vibration | Device powered off |
| Bluetooth Paired | Complete pairing on phone | Blue quick flash ×3, then off | 1 short vibration | Initial connection made, auto-reconnect enabled |
| Start Recording | Hold record button | Green solid | 1 short vibration | Recording in progress |
| Stop Recording | Release record button | Green off | — | Recording saved |
| Max Recording Duration | Max recording time: 5 min, auto-stop | Red quick flash ×3, then off | 1 long vibration | Recording stopped & saved, function temporarily locked |
| Storage Full | Press record button (when full) | Red solid (while pressed) | 2 cycles of rapid short vibrations | Cannot record, free up space |
| Charging | Connect charger (<100%) | Green slow flash | — | Charging |
| Charge Complete | Connect charger (100%) | Green solid | — | Battery full |
| Low Battery ≤10% | Auto-detect | Red slow flash | — | Charge immediately |
| Auto-Shutdown | Auto-detect (≤1%) | Red quick flash ×3, then off | — | Battery depleted shutdown |
| Factory Reset | Hold power button for 10s | Red & blue alternate flash ×3, then off | 2 long vibrations | Pairing cleared, factory settings restored |
Notes:
- For optimal recording quality, ensure the device microphone area is unobstructed during use.
- Regularly manage storage space and back up important recordings via the Bluetooth companion application.
- The system reset operation erases all pairing information. Please proceed with caution.
FCC Rules
This device complies with part 15 of the FCC Rules. Operation is subject to the following two conditions: (1) this device may not cause harmful interference, and (2) this device must accept any interference received, including interference that may cause undesired operation.
Any changes or modifications not expressly approved by the party responsible for compliance could void the user's authority to operate the equipment.
Notes
This equipment has been tested and found to comply with the limits for a Class B digital device, pursuant to Part 15 of the FCC Rules. These limits are designed to provide reasonable protection against harmful interference in a residential installation. This equipment generates, uses and can radiate radio frequency energy and, if not installed and used in accordance with the instructions, may cause harmful interference to radio communications. However, there is no guarantee that interference will not occur in a particular installation.
If this equipment does cause harmful interference to radio or television reception, which can be determined by turning the equipment off and on, the user is encouraged to try to correct the interference by one or more of the following measures:
- Reorient or relocate the receiving antenna.
- Increase the separation between the equipment and receiver.
- Connect the equipment into an outlet on a circuit different from that to which the receiver is connected.
- Consult the dealer or an experienced radio/TV technician for help.
The device has been evaluated to meet general RF exposure requirements. The device can be used in portable exposure conditions without restriction.